Amazon・楽天
でも販売中
でも販売中
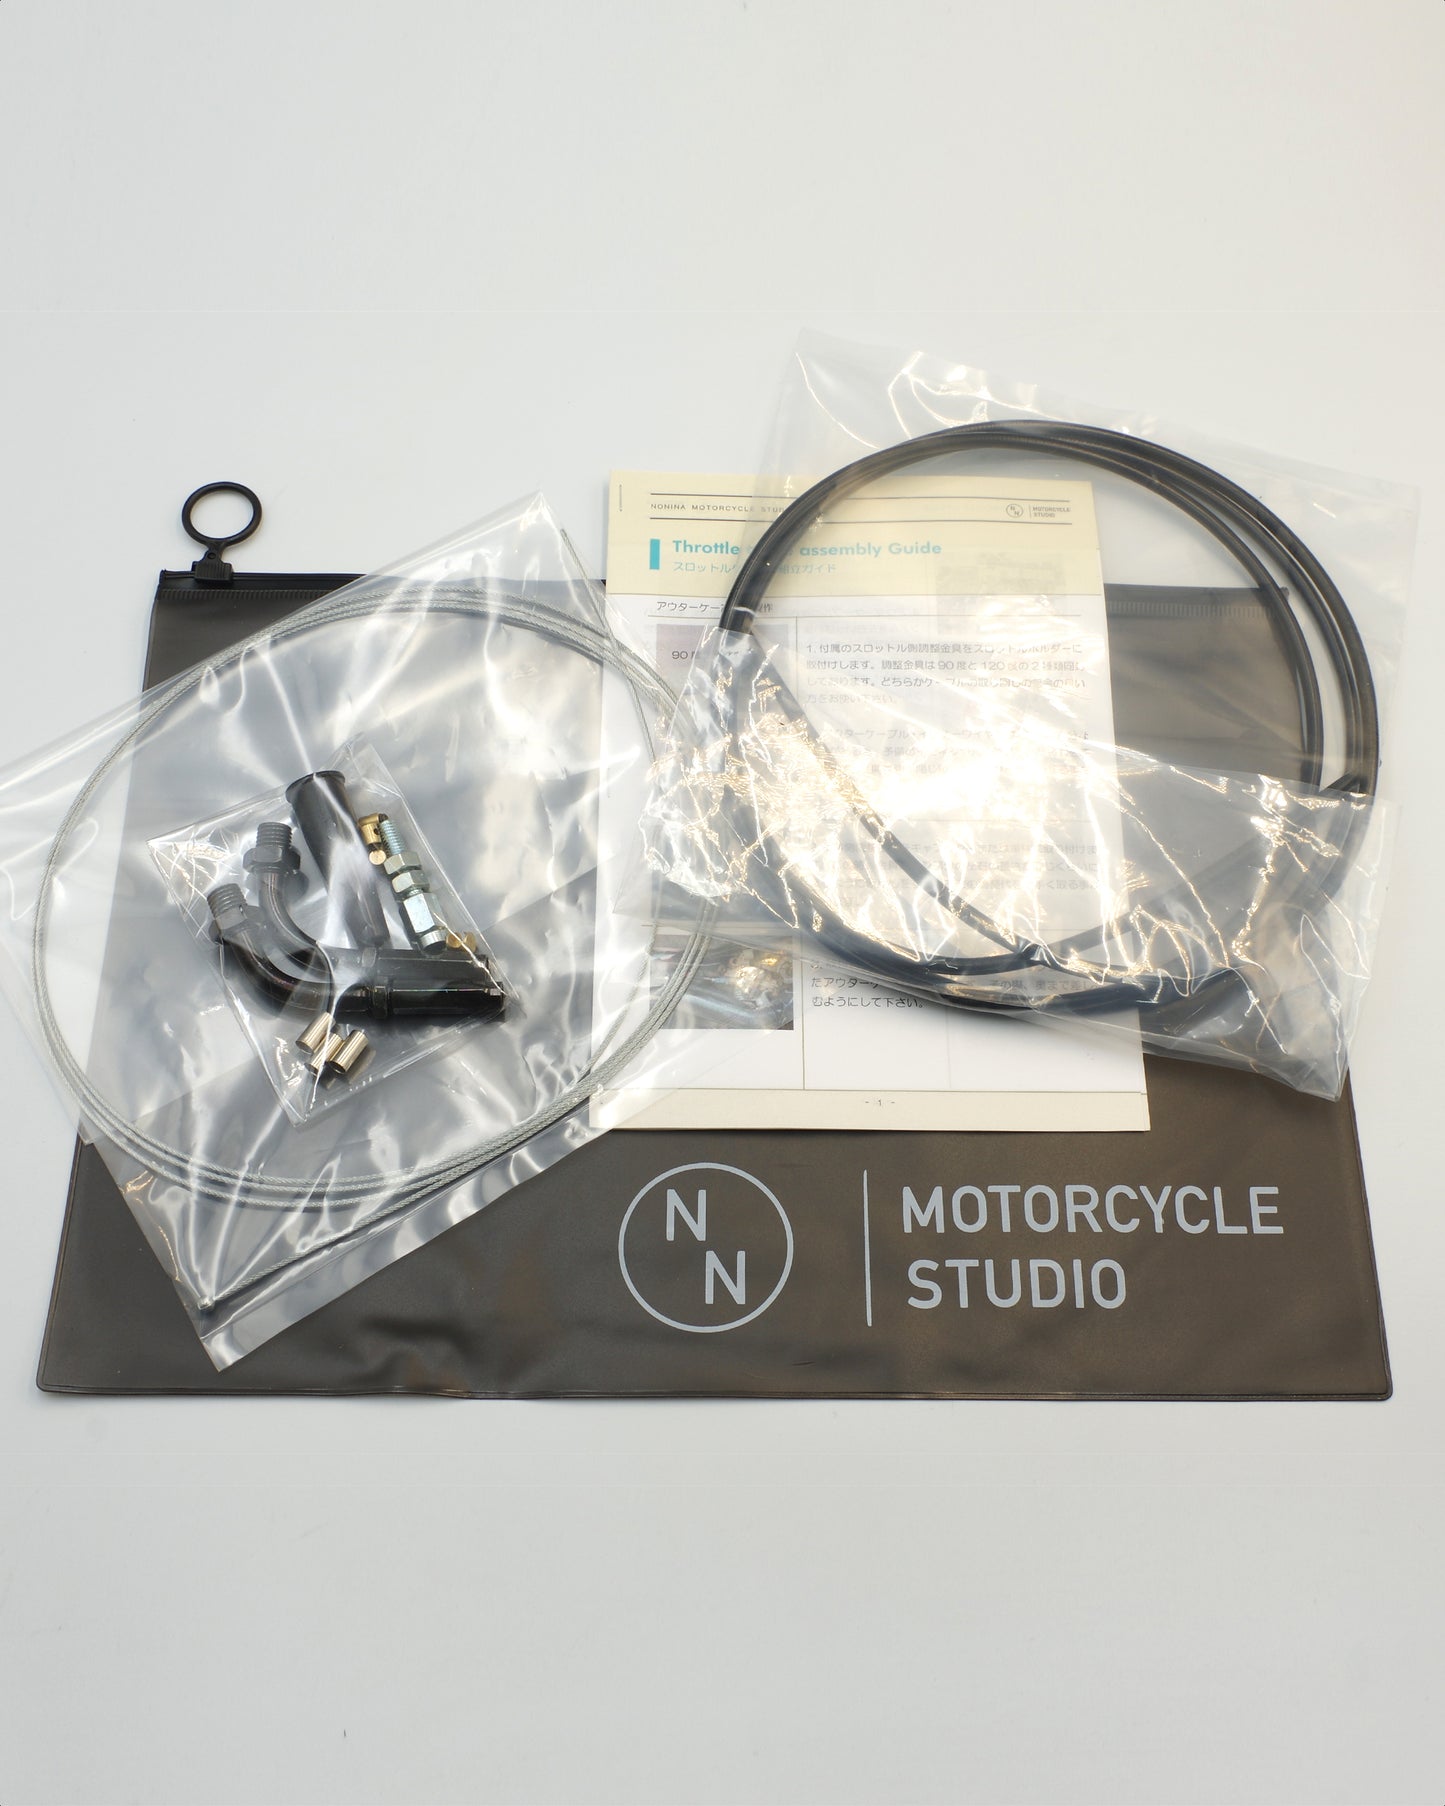

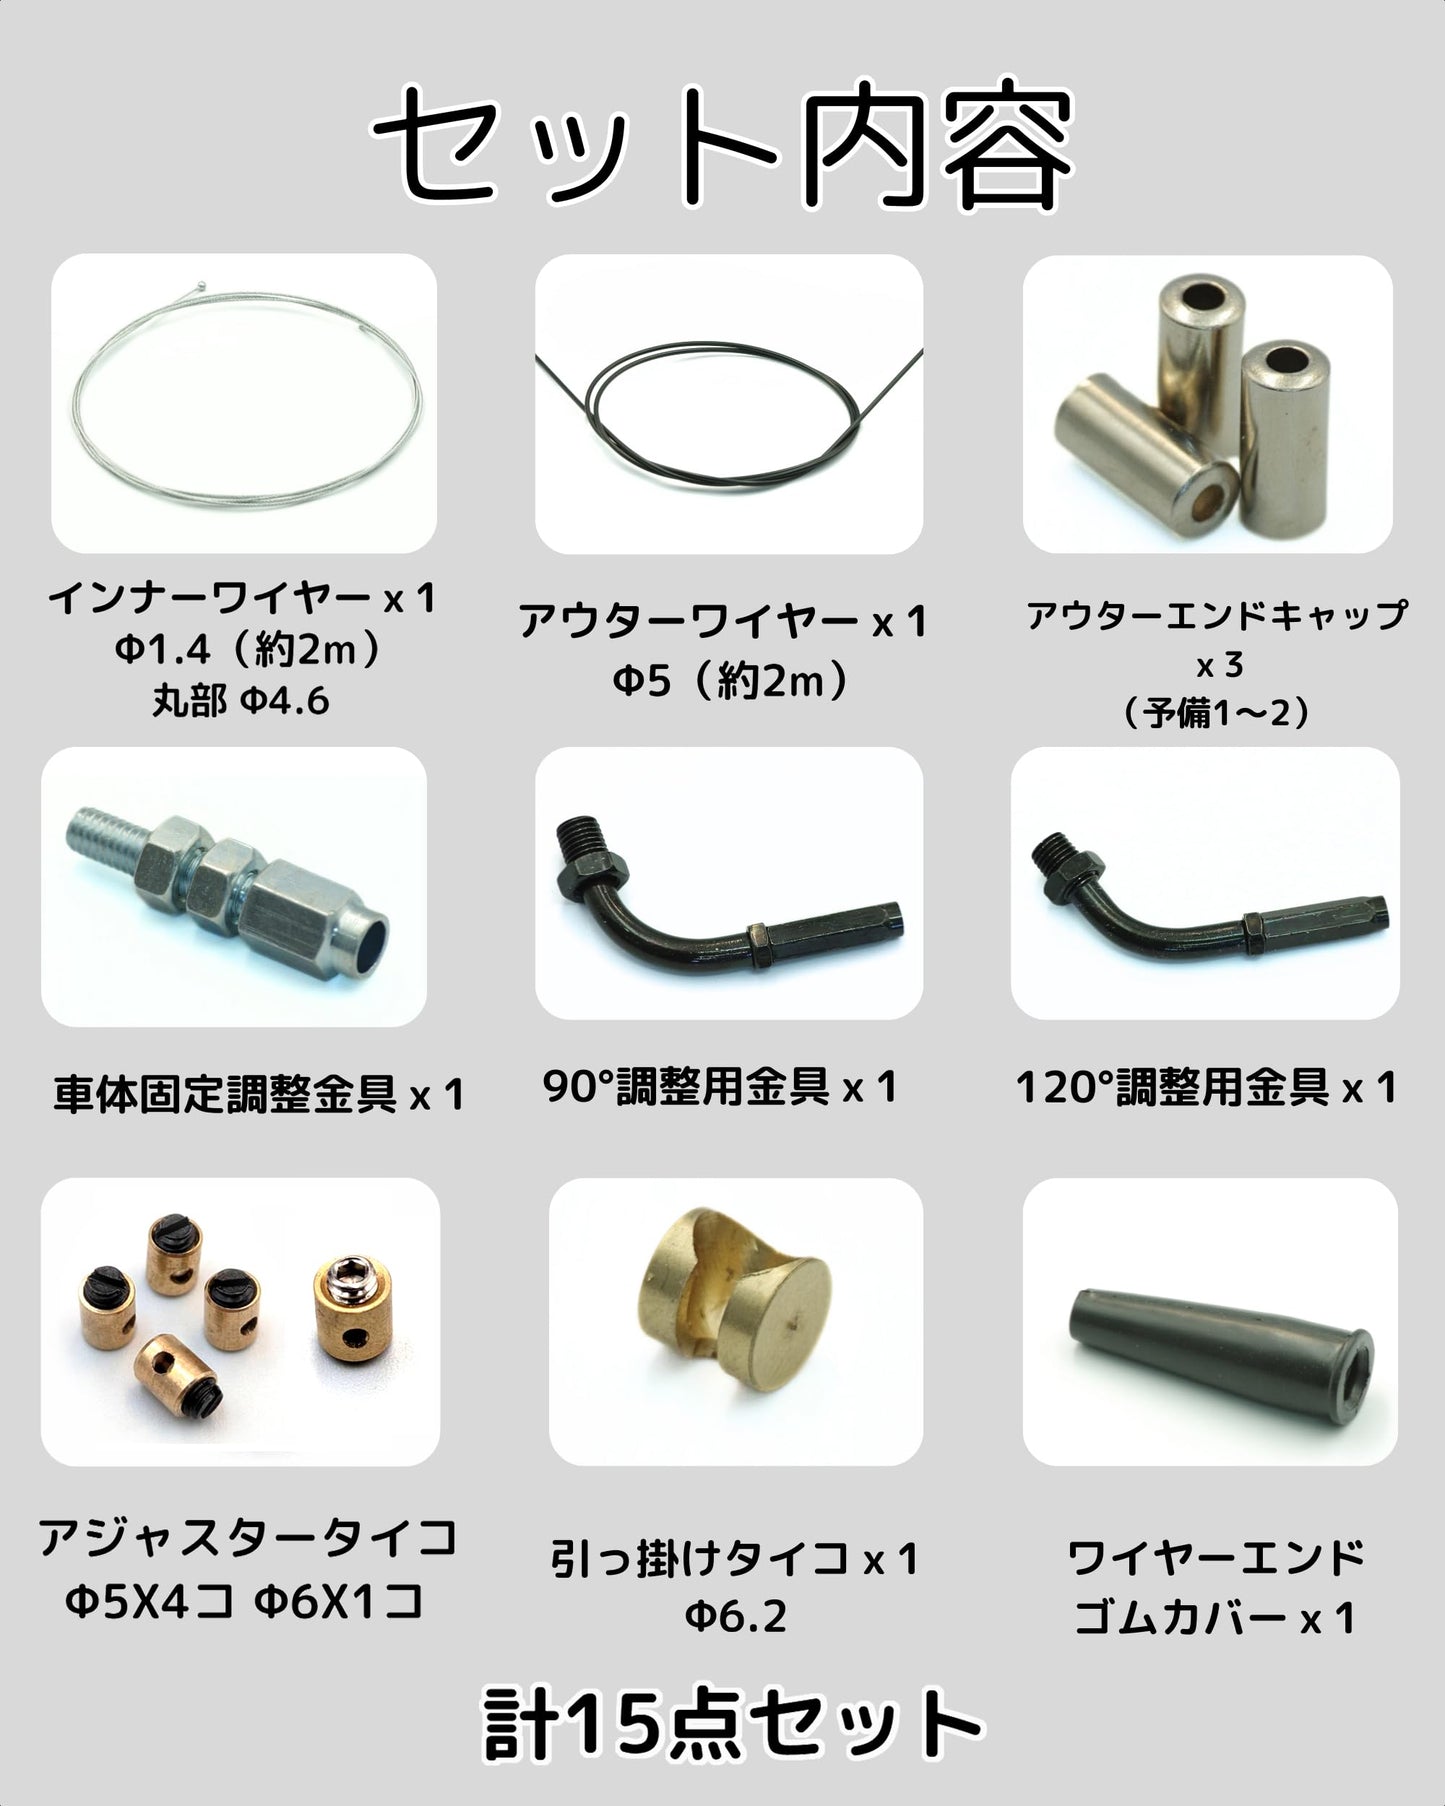

Attach the included throttle side adjustment bracket to the throttle holder. Two types of adjustment brackets are included: 90 degrees and 120 degrees. Use whichever is more convenient for cable management.

Attach the vehicle-side adjustment bracket to the carburetor or vehicle. At this time, temporarily fasten the bracket so that the left and right screw lengths are approximately the same, so that you can make adjustments later. Insert the outer cable with the end cap bracket attached into the attached vehicle-side adjustment bracket. Make sure to insert it all the way in.

Decide the length of the outer cable. At this time, turn the handlebars of the vehicle as far as they can to the left and right, and route the cable around the maximum tension position. Once you have routed the cable, mark the length to cut with masking tape or something similar.
*To check, shake the handlebars of the vehicle left and right to make sure the outer cable is not too short or has any problems with handling.

Cut the outer cable with a hacksaw or similar tool along the marks you made. Be careful not to crush the hole inside the cable. If you try to cut it with pliers or similar tools, it may get crushed. It is easier to cut it using a grinder or similar tool.

Put the end cap onto the end of the cut outer cable. Make sure to push it all the way in so that the end cap does not float up.
*If it is difficult to insert the end cap or if there is a burr on the inside of the hole in the cut outer cable, remove the burr with a round metal file or similar before inserting the end cap.

This completes the preparation of the outer cable. If you removed it before working on it, attach it to the vehicle body.
A rubber cover to cover the screw part of the adjustment bracket is included as an accessory. Please pass it through here when installing.

Please check the attachment point of the drum on your vehicle (carburetor) and choose the appropriate size from the three types of drums provided. If using the drum type, hook the round part of the wire inside. If using the set screw type, cut the round part of the wire and secure it with the set screw. If you want to hook the round part of the wire, use it as is.

If you are using a set screw type, you will need to secure the wire drum in place. To make it stronger, we recommend soldering it with stainless steel. First, apply flux material and then solder so that it fills in the gap between the wire drum and the wire. If you heat the wire drum itself before attaching it, the solder will soak in better. However, be careful not to let the solder flow onto the wire, as this will cause the wire to lose its flexibility. Use a file or similar to finish off any solder that is sticking out from the wire drum, so that it does not get caught on anything.
*Please prepare solder and a soldering iron for stainless steel.

Hook the drum onto the carburetor and pass the inner wire from the vehicle side to the handlebar side. The inner wire will not pass through easily around the bend in the adjustment bracket attached to the throttle holder, but you can pass the wire through by rotating it. When passing the inner wire through, we recommend that you oil it to ensure smooth operation.

Make sure that the outer cable is properly inserted all the way into the metal fitting, and leave the adjustment screw in the middle position so that adjustment margin can be made in either direction.

Determine the length of the inner wire. Check the throttle drum attachment position, mark it or temporarily fasten the set screw drum, and then determine the length of the inner wire. Since the inner wire is wound up, it is difficult to determine the length in one go, so start with a longer length and adjust it in stages in the later steps. Be careful, because once you cut it short, you cannot go back.

After cutting the wire, it may fray and become impossible to pass through the drum, so move the drum to the back without removing it from the wire and cut the wire. After cutting, set the wire so that it is at the end of the drum and tighten the set screw so that it will not come off even if you pull it.
*It is hard, so please prepare tools such as wire cutters.

Install it and check the operation and handling of the inner wire. If the inner wire is long, shorten it little by little at this stage to make fine adjustments. Once you have finished adjusting, tighten the set screw again to make the final tightening.
*The bent parts of the adjustment fittings on the handle throttle side are prone to slippage, so please apply a lubricant or oil to these parts before checking their operation.

Apply flux in the same way as in step 2, and firmly secure the set screw drum with solder, making sure there is no snagging. If the throttle holder is too narrow and the drum interferes, grind down the interfering part to adjust it so there is no interference, then reinstall and check.

Finally, adjust the adjustment mechanism on the vehicle body and handlebars to your preferred comfort. If you have passed the rubber cover through the outer cable when installing it,
Then the rubber cover is attached and the assembly is complete.